728x90
반응형
1. 실행 화면
2. 실제 코드 각주 및 설명
3. 전체 코드 공유
4. 참고 블로그 && youtube 영상 *ctrl + f를 눌러 각 확인하고자하는 차례만 확인하세요!
---------------------------------------------------------
1. 실행 화면
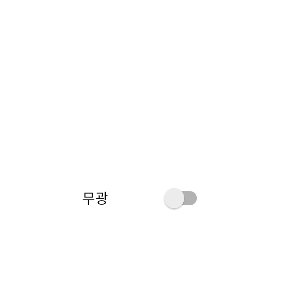 |
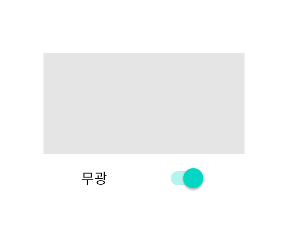 |
2. 실제 코드 각주 및 설명
º activity_main
<TextView
    android:id="@+id/matte"
    android:layout_width="200dp"
    android:layout_height="100dp"
    android:layout_centerHorizontal="true"
    android:layout_centerVertical="true"/>
RelativeLayout으로 설정(vertical)
centerHorizontal = 세로 가운데 정렬 | centerVertical = 가로 가운데 정렬
width, height = 각각의 임의 크기 설정
<androidx.appcompat.widget.SwitchCompat
    android:id="@+id/change_sw"
    android:layout_width="125dp"
    android:layout_height="wrap_content"
    android:layout_below="@id/matte"
    android:layout_centerHorizontal="true"
    android:layout_centerVertical="true"
    android:text="무광"/>
스위치 생성코드
below : 해당 id의 가운데에 위치
º MainActivity
public class MainActivity extends AppCompatActivity {
    public TextView matte;

    @Override
    protected void onCreate(Bundle savedInstanceState) {
        super.onCreate(savedInstanceState);
        setContentView(R.layout.activity_main); //기본틀

        matte = findViewById(R.id.matte);
        SwitchCompat change_sw = findViewById(R.id.change_sw); //main에서 id로 해당 객체 가져오기

        change_sw.setOnCheckedChangeListener(new CompoundButton.OnCheckedChangeListener(){
		//스위치 체크 리스너 선언
            @Override
            public void onCheckedChanged(CompoundButton compoundButton, boolean isChecked) {
                if(isChecked){ //체크 되었을 경우
                    matte.setBackgroundColor(Color.parseColor("#1A000000")); //투명도 설정
                }else{
                    matte.setBackgroundColor(Color.rgb(255,255,255)); //흰색으로 변경
                }
            }
        });
    }
}
* 주석으로 설명을 넣었습니다.
3. 전체 코드 공유
package com.bliss.csc.customdetail;

import androidx.appcompat.app.AppCompatActivity;
import androidx.appcompat.widget.SwitchCompat;

import android.graphics.Color;
import android.os.Bundle;
import android.widget.CompoundButton;
import android.widget.TextView;

public class MainActivity extends AppCompatActivity {
    public TextView matte;

    @Override
    protected void onCreate(Bundle savedInstanceState) {
        super.onCreate(savedInstanceState);
        setContentView(R.layout.activity_main);

        matte = findViewById(R.id.matte);
        SwitchCompat change_sw = findViewById(R.id.change_sw);

        change_sw.setOnCheckedChangeListener(new CompoundButton.OnCheckedChangeListener(){

            @Override
            public void onCheckedChanged(CompoundButton compoundButton, boolean isChecked) {
                if(isChecked){
                    matte.setBackgroundColor(Color.parseColor("#1A000000"));
                }else{
                    matte.setBackgroundColor(Color.rgb(255,255,255));
                }
            }
        });
    }
}
-
<?xml version="1.0" encoding="utf-8"?>
<RelativeLayout xmlns:android="http://schemas.android.com/apk/res/android"
    xmlns:app="http://schemas.android.com/apk/res-auto"
    xmlns:tools="http://schemas.android.com/tools"
    android:layout_width="match_parent"
    android:layout_height="match_parent"
    android:orientation="vertical"
    tools:context=".MainActivity">

    <TextView
        android:id="@+id/matte"
        android:layout_width="200dp"
        android:layout_height="100dp"
        android:layout_centerHorizontal="true"
        android:layout_centerVertical="true"/>

    <androidx.appcompat.widget.SwitchCompat
        android:id="@+id/change_sw"
        android:layout_width="125dp"
        android:layout_height="wrap_content"
        android:layout_below="@id/matte"
        android:layout_centerHorizontal="true"
        android:layout_centerVertical="true"
        android:text="무광"/>

</RelativeLayout>
4. 참고 블로그 && youtube 영상
https://www.youtube.com/watch?v=NWLl9XKEHPs
https://minggu92.tistory.com/2
[Android] 배경(XML)에 투명도(Opacity) 적용
[Android] 배경(XML)에 투명도(Opacity) 적용 * 목표 : xml을 이용해 레이아웃에 Opacity를 적용하도록 한다. 안드로이드 색상 형식은 #AARRGGBB이고 앞에 'AA' 부분이 알파채널 16진수이다. 이 부분을 바꿔서.
minggu92.tistory.com
위 블로그에 들어가시면 투명도에대한 코드가 잘 설명되어있습니다. minggu92최고..!
728x90
반응형
'웹 & 앱 꿀 TIP' 카테고리의 다른 글
| [android] url 이미지 안드로이드 activity에 띄우기 (1) | 2022.06.12 |
|---|---|
| [android] 내가 겪은 retrofit 오류 및 설명 (0) | 2022.06.06 |
| 사소하지만 알아두면 좋은 정보 [사알좋정] _ Java편 (0) | 2022.01.19 |
| 사소하지만 알아두면 좋은 정보 [사알좋정] _ 통신편 (0) | 2021.12.18 |
| 웹 메뉴 만들기 기초 1 (0) | 2021.12.15 |


